
The changes done in the very recent balance patch did not receive much praise from the community, especially Greyjoy players.
There has been some good stuff (Blacktyde Chosen and Reapers) and some bad (Erik Ironmaker), but I have seen even more than before many complaints about the Greyjoy tactics deck, which did not get changed.
I always really liked that deck, so I wanted to give some pointers to players who wanted to get the most of it but for some reason seem to really struggle with it. Greyjoys are my favorite faction to play with and against, and I find it sad that so many players think of them as a bad playing experience, so the goal of this article is to help find ways for them to turn this around!
Helping Tools
Let’s start outside the tactics deck in itself: Greyjoys are actually quite well equipped for any card problem they might encounter. How? With 2 of their best NCUs, Maester Wendamyr and Rodrik Harlaw!
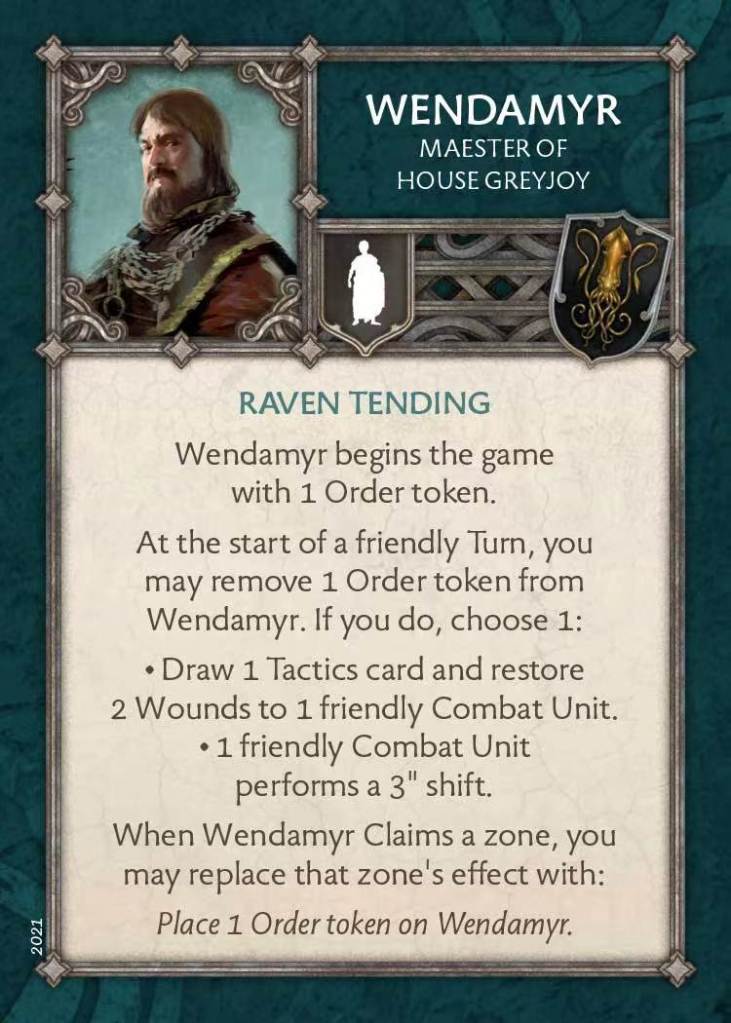
Maester Wendamyr is definitely the faction best NCU, providing excellent flexibility in both his zone replacement ability and the tokens he gets from it. While you may keep the tokens for the 3” shifting they can give, they also allow you to heal 2 wounds and draw 1 tactics card. This gives you the opportunity to cycle through your deck faster than you normally would, while at the same time healing a unit, which will definitely come in handy at some point! It has a very simple trigger, being a start of friendly turn, so easily usable.
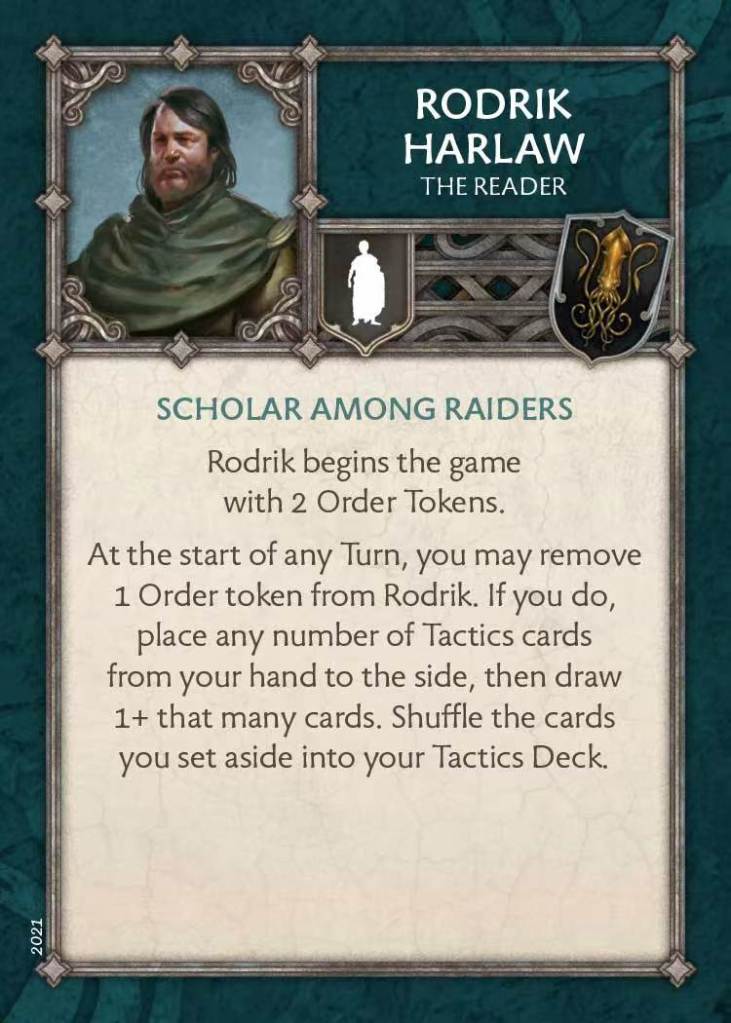
Rodrik Harlaw on the other hand has one mission and one only: getting you the cards you need at the right time! You have a selection of cards full of currently unplayable ones? Use Rodrik’s order to put all of them back in your deck and draw the same number +1 card! Rodrik is one of the best tools in the game to cycle through your deck fast and get the help you need. Triggers can be quite hard to make the most of the Greyjoy cards at some points in the game, or it happens that a unit may be at death’s door and you really need that “What is Dead May Never Die” card, so Rodrik is usually the most efficient tool in the Greyjoy arsenal to mitigate these issues.
Granted, it does happen that the cards you draw end up being the exact duplicates as the ones you just threw away (in tournament even!), but it is a rare enough occurrence to guarantee Rodrik Harlaw a spot in my Ncus trio…
The triplet Wendamyr-Rodrik-Erik/Littlefinger (depending on your units and pillage needed amount) is still my favorite NCU triplet in the game, so I would definitely advise it for any Greyjoy player out there!
Bless With Stone, Bless With Steel
Let’s start with one of the harder ones to use.
This card starts with a relatively easy to use trigger, unit activating. Where it gets tricky is that its first effect is entirely dependent on the number of kills on each side of an engagement: in most games I played, either my unit or my opponent’s one did not take enough wounds to be usable. So the first part of this card, if timed perfectly, is awesome, but in most cases will be hard to trigger.

The second part however is great: for each zone you control between the swords or bags, you can heal 1 more wound… OR remove a condition token! Apart from the bags zone, this is the only way for Greyjoys to remove condition tokens. This makes it a very useful card against factions such as Lannisters or Baratheons with some powerful token generation. Controlling both zones is obviously ideal, but may be quite hard to do since both are the 2 most sought after in late rounds. One option if you want to make the most of this card is to get Petyr Baelish as your third ncu: his once per game ability allows you to control the missing zone and be able to remove 2 tokens with one card! Plus, his 3 other tokens allow you to control these zones but using others, such as the Letters, should you need any more cards…
The Iron Price
This is the weirdest card to play in the deck: it has a simple enough trigger, start of friendly turn, but requires great sacrifice. Pillage is tough enough to come by in a Greyjoy list with many units requiring it, removing it for a small reward does seem like a waste. However, depending on your list composition, it could find a place in your game.

Did you bring Erik Ironmaker but have only 2 units requiring pillage? Well maybe it’s now round 3 and you are maxed out, so removing pillage to heal or hitting at full capacity could be a great option. You may destroy one more rank and get your pillage back after only 1 attack!
This card more than others is entirely dependent on the state of the game and your units. If for example you are at 7 models in a unit, you may want to spend one pillage to get back to 9, giving you 3 ranks. If you are at 3 models left against a unit with 2 models, you may want to use it to get your highest attack value, guaranteeing a kill.
This card is also the perfect “Rodrik tool”: you have it in your hand but don’t have enough pillage to justify using it? Great, it’s currently useless, so use it to get 2 new cards!
Finger Dance
Finger Dance is the obvious card to attach on Bowmen.
Vulnerable tokens are quite commonly dished out by Greyjoy units, meaning it is easier to have your attacks make an impact, which is sorely needed given the overall abysmal defense of the faction. The issue with this card is that your unit can also receive a Vulnerable token on if attacked by an enemy with the same or more ranks.
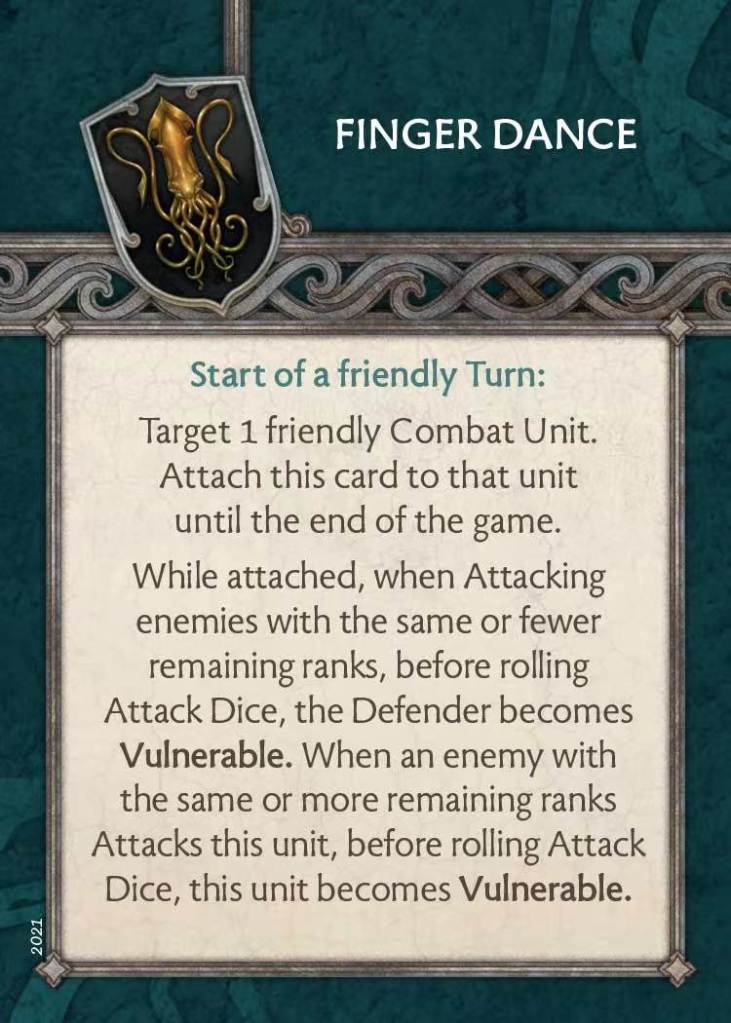
As such, it is a Sword of Damocles type of card, which means attaching it to the Bowmen is the safest way to prevent the second condition to happen. Another unit to attach it to is the Ironmakers, who with their high defense will probably be one of your healing targets and stay at a higher number of ranks.
I could see it working pretty well on the new Reapers version too in some cases, as dishing Vulnerable tokens could make panic tests happen more easily, and they have some healing mechanism to help staying at higher rank number.
If you have none or only one of these units however, it becomes a very dangerous card to attach, at which point I advise to use it as Rodrik fodder or card cycle tool.
The Kraken’s Wrath
A really good combat card: it has sufficient options to give you at least 1 free token and Precision, with rerolls being a nice bonus. It is a great card for Ironmakers and their Critical Blow for maximum hits + wounds potential, but also works well for Reapers and Silenced Men, to cause a maximum of panic tests.
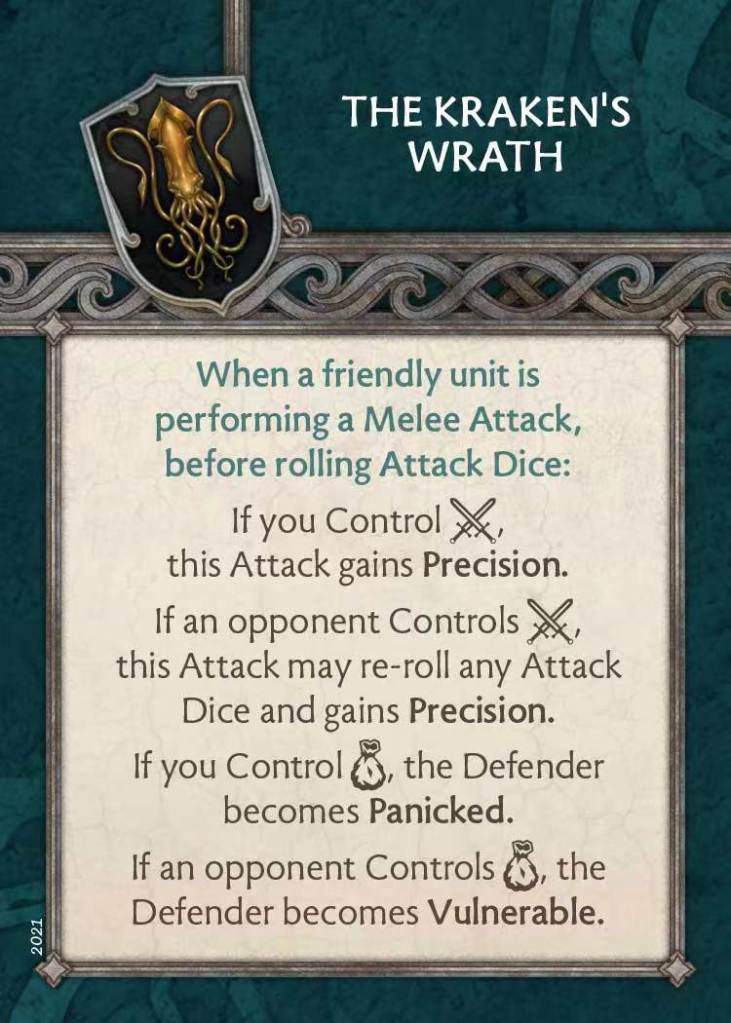
If you have it in your hand before claiming any zones, it can give you some additional consideration on which one to choose.
Be careful when planning with it however, as some of the cards below require you to control the swords or the bags, so you may need to choose depending on these rather than this one, which is more flexible.
Raiding Call
The Greyjoy “healing” card by excellence. It doesn’t technically heal, but allows you to place your resources where you need them, be it models or pillage tokens.
It can be insanely useful mid-late game, when you are for example in dire need of units in the midst of the combats, and your Bowmen unit is still chilling nearby at full ranks.
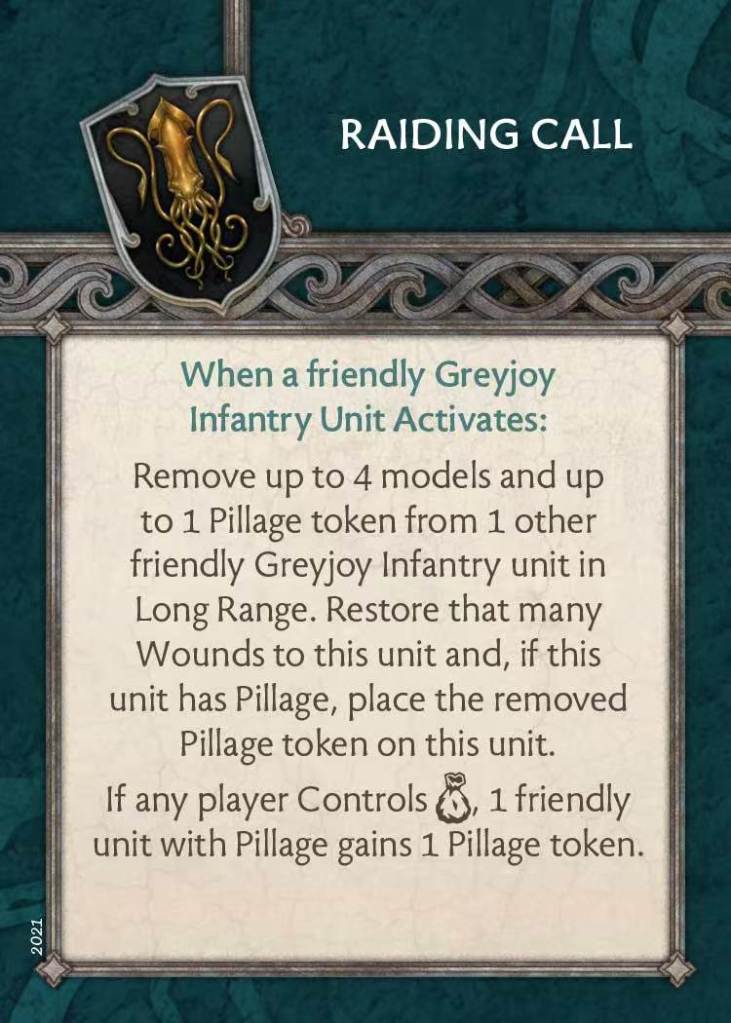
Its trigger is when a unit activates, which actually means that it can be combined with other tools in your arsenal for a healing cycle: Wendamyr and Moqorro both heal on a start of a friendly turn, which means you can combine them with this card to get an endangered unit back to full ranks in one turn! Even better, the Drowned Men order works at the start of any turn, so you could do something like: Moqorro/Wendamyr heal, Raiding Call, Drowned Men heal. All this in basically 1 turn!
This card can also be one of your only resources in early game for pillage. Drawing it on round 1 would be completely useless (unless being on the receiving end of a crown zone and not having access to the bags one, which is rare but could happen) if not for the second ability of the card.
Now imagine having Victarion in Reavers with Erik and Wendamyr NCUs: put a Pillage token on his unit with Erik, replace zone by getting a Wendamyr token, shift twice with Wendamyr tokens, play Raiding Call when activating them and charge with Rush of Agression. That’s one charge with Vulnerable, 7 attacks on 2+ and Sundering. End of round 1.
So this card gives you really good beginning and mid-end of game options. Ideally you want to get it on round 3 to use it in coordination with the Iron Price after receiving a certain number of wounds, but it has enough flexibility to guarantee a use every time you get it in your hand. Provided you have units with Pillage of course. If not… Rodrik fodder time!
We Do Not Sow
Starks beware, the kraken also has teeth! The free attack card of the Greyjoys is an obvious winner, giving them more opportunities to use their very offensive profiles.
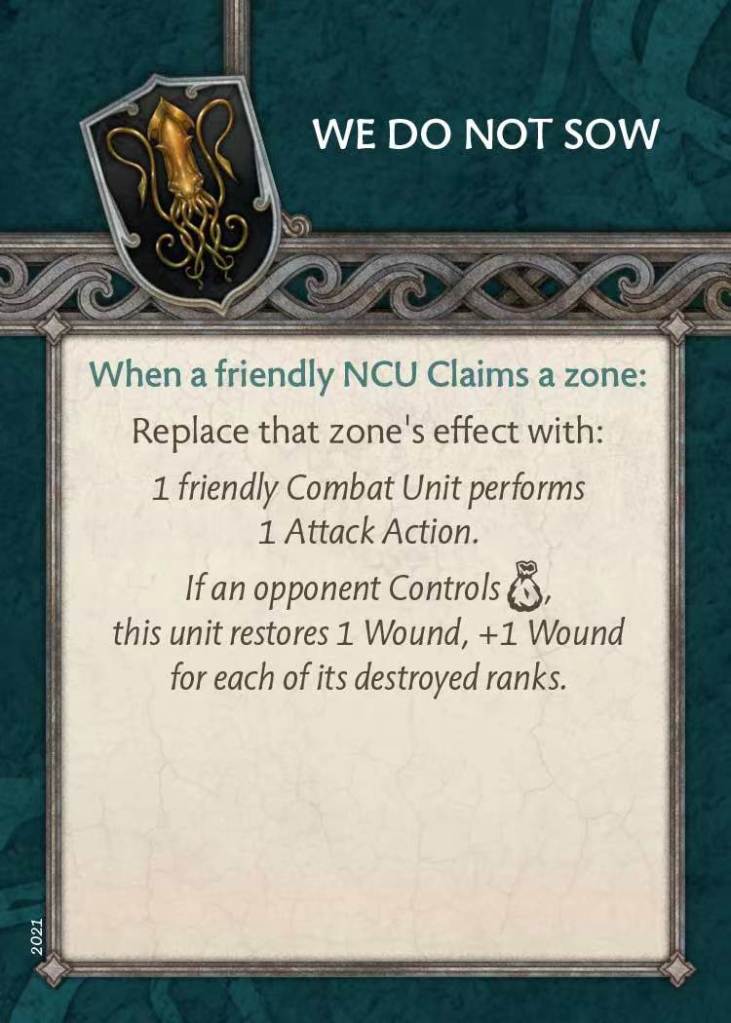
It is a simple enough zone replacement card, giving you a free attack. It is best played on a round where you can start by claiming the swords zone. More often than not, your opponent will want to heal or retreat: if they heal, you can now use the card to maximum effect on another zone. If they retreat, you can claim another zone with Wendamyr to get a token, and leave the bags zone open. If after that they still do not claim it, you can use the card for a simple free attack without the healing bonus, but preventing them from healing too.
Another great application of this healing ability is that a lot of players will use Baelish’s once per game ability to control the bags, should they have Bronn attachment or Hedge Knights for example, which means giving you access to the second part of the card even after having used the bags zone!
What is dead may never die
The Greyjoy card by excellence, the one every other faction would love to have in their arsenal, the Drowned God blessing!
Of course, being such a powerful card, it does come with a drawback: any further actions you may take will necessitate you to control the swords zone, or otherwise take D3 wounds and potentially die right after having survived.

This makes once again Petyr Baelish a good additional ncu for Greyjoys, helping you getting control of the swords at the right time. This also makes Wendamyr and his healing tokens, as well as Drowned Men and their healing order, quite essential, to make sure to heal at least once before doing any further action.
When to use WIDMND? I would say it depends on the state of the field.
Is your unit being destroyed on the last activation of a round? It might be worth it to keep it alive just to prevent you being submerged on the next one. If your opponent becomes First Player, he will waste an activation to finish you, and if you become First Player, you have a chance for one last free attack and potential healing.
Is your Bowmen unit getting destroyed by an attack before the panic test, and you don’t have any morale boost? Might be worth it to keep it in your hand for the next unit to die since you have great chances to die after the panic test anyway. Using the WIDMND card after getting killed from a panic test is definitely less risky.
In most cases, it is worth it to use the card when your first unit gets killed, to keep your activation number up, but you should absolutely check the board and field state before rushing in with the “magic card”.
There you have it, a full review of the Greyjoy deck!
I hope it may have provided you with some extra insight and ideas on how to make the most of it. I personally really like this deck as it is one of the rare factions were I usually get to 1 card left at the end of the game.

While not every card will be useful during a game, they offer enough variety in triggers and effects to grant some help. 4 of them provide healing, 6 of them combat efficiency (yes I include Raiding Call for the pillage token and Blessed for removing weakened tokens) and 1 can prevent you from dying!
This basically goes full into the Greyjoy faction moto: attack, heal, attack, heal, attack, heal…
No time for all these intrigues and subterfuges, if you play Greyjoys, you pay the iron price and you do not sow!
Grob’

